Hi there! This is
Gang Fight speaking - the
creator of PC-98 Bot. Our only real authority on PC-98 is that we've
put a stupid amount of time playing PC-98 on an emulator. That being
said, in our thousands hours of doing this we've picked up on a few
things we wish was more apparent when we were first getting started.
We hope this guide can help make the dive a little bit easier when it
comes to swimming through the PC-98's enigmatic catalogue.
This guide will try to keep things simple for beginners by limiting
its scope. It'll only cover topics users will run into when running
Neko Project 21/W with software found in the Neo Kobe Collection. If
you're looking for something beyond that,
check out the end of the guide for some
resources that might have you find what you're looking for.
Specifically, if you're looking for advice on physical hardware you
should definitely check out the
Choosing Your 98
page on the 9800 Western Guide by babyloveunkind. If you have any more
questions in that department I recommend asking for help in the
PC-98 Series Central
Discord. The PC-98 Discord community is very active, friendly, and helpful;
and they'll probably lend you a hand if you ask nicely.
Download Emulator
Windows/Linux
This guide is essentially all about using
Neko Project 21/W. Neko Project
21/W is currently in active development but it’s
considered to have the best record in terms of accuracy compared to
its alternatives. The homepage is in Japanese, so you can
click this link to go directly to the
download page. Just click the first link under the header “Neko Project 21/W関連”
for the most recent version. Unzip the file contents and
open the bin folder. The executables in this folder are your
emulators.
OSX
If you're an OSX user it's recommended you stick with
Neko Project 2. While it’s
not the strongest emulator in terms of accuracy and it's no longer
receiving updates, it’s still a quality emulator that won't diminish
your experience too much. For information on configuring Neko Project
2 I recommend checking out
46 OkuMen’s Emulation Guide.
Where To Download Games
The
Neo Kobe Collection
is the most comprehensive collection of PC-98 software on the
internet. While it would be nearly impossible to compile a complete
library PC-98 software, this is probably the closest someone could
come.
It’s sorted by publisher, so I recommend checking
MobyGames
for publisher details if you’re looking for a specific title.
Configure Emulator
This section is written for Project 21/W. If you're using Neko
Project 2 some of this information will apply, but not all of it.
None of this is required, but I do at least recommend following
this guide’s tips for adjusting the CPU and Sound Sampling Rate
immediately below. Other than that you can pick and choose which of
these options are best for you, or apply these if you run into
specific issues.
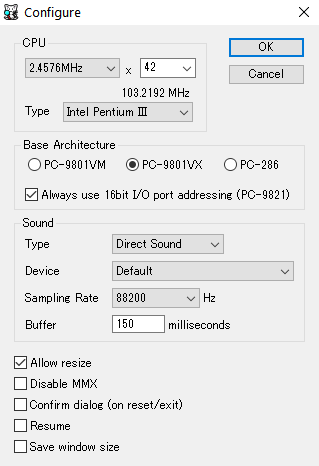
Increase CPU & Sound Sampling Rate
Follow this path in your emulator toolbar:
Emulate => Configure
Under the CPU section you should see a dropdown for a CPU multiplier
with the number ‘20’ preselected. Feel free to
increase it to 42 for most games. If you're experiencing
slow-down you can turn it down to 32, but you'll most likely be
fine. If your game is running too fast (this happens sometimes for
older games) don’t be afraid to slow things down by setting the CPU
multiplier to a lower number. Getting your CPU speed around 16MHz is
usually good for these speed sensitive titles.
Under the Sound section
increase the Sampling Rate from 44100Hz to 88200Hz. There are
rare situations where you might want a lower Sampling Rate, but
generally speaking the higher the better.
Following my instructions your settings should look like this:
Set Font File
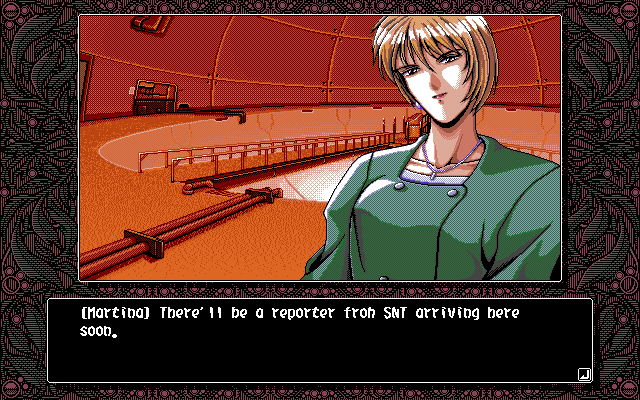
A common complaint with Neko Project 21/W is the default font,
especially for English text. Here's an example of what it looks like
out of the box:
"[Maytina] Tbeye'll be a yepoytey fyob SNT ayyiving beye soon."
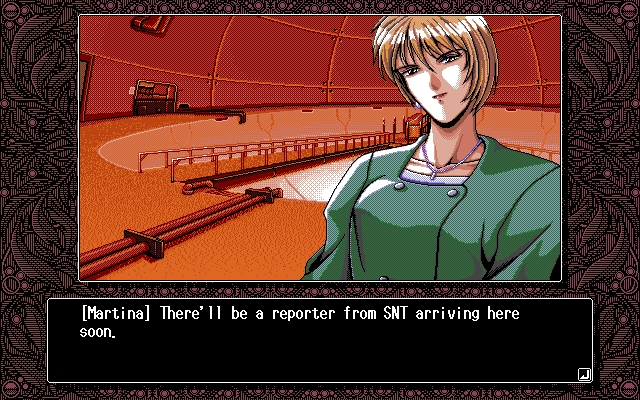
Luckily this is easy to change.
Download a replacement font file. There's a few I've seen
recommended, but FONT.ROM is the most
popular.
Follow this path in your emulator toolbar:
Emulate => Font...
Select your recently downloaded font file.
Reset your emulator.
If you ever want to remove your linked font file open up
np2w.ini (found in this same directory as your emulator exe
file) and remove the line that starts with fontfile=.
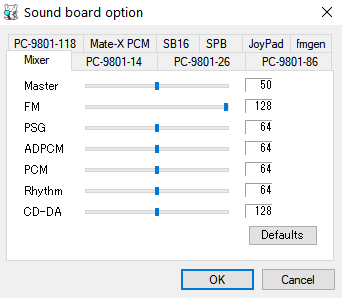
Adjust Sound Balance
NP2 has decent sound emulation, however with the default settings the
FM level is low compared to actual hardware. Here’s the fix:
In the toolbar navigate to: Device => Sound Option
Turn FM from 64 to 128 in the Mixer tab. (if it’s too loud
for your taste you can find a comfy place somewhere in between)
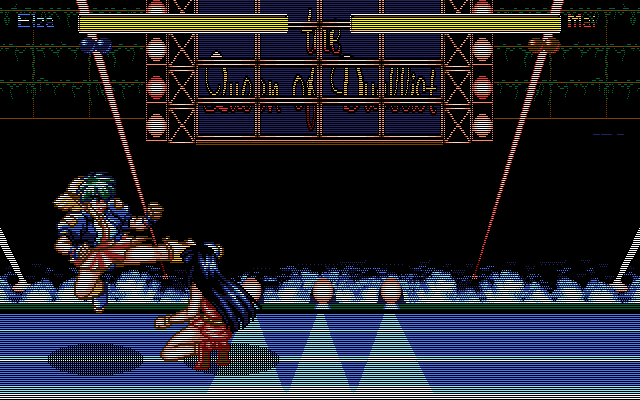
Get Rid of Scanlines
Due to limited processing power at the time of release some games are
rendered in a low vertical resolution. The hardware then makes the
game fit the standard screen resolution by skipping every-other line
while rendering. This can result in unappealing scanlines that darken
the image. The "scanline" issue is common especially with action
oriented games.
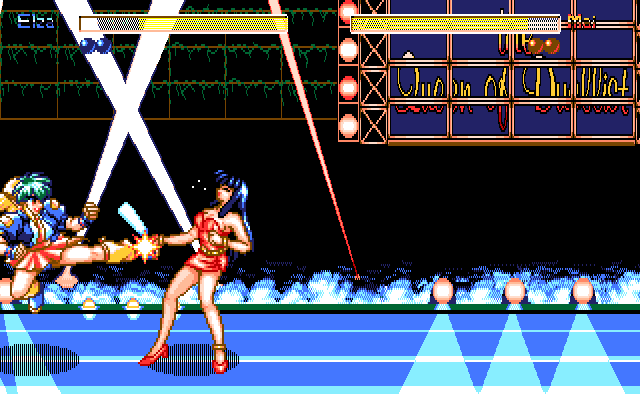
The Queen of Duellist Gaiden Alpha
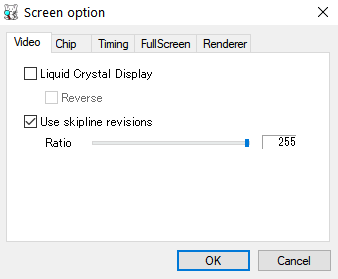
Neko Project has a built-in setting that fills in these "skiplines"
for games that use them.
Follow this path in your emulator toolbar:
Screen => Screen Option
Select 'Use skipline revisions' and
slide the scale all the way to 255 under the Video tab.
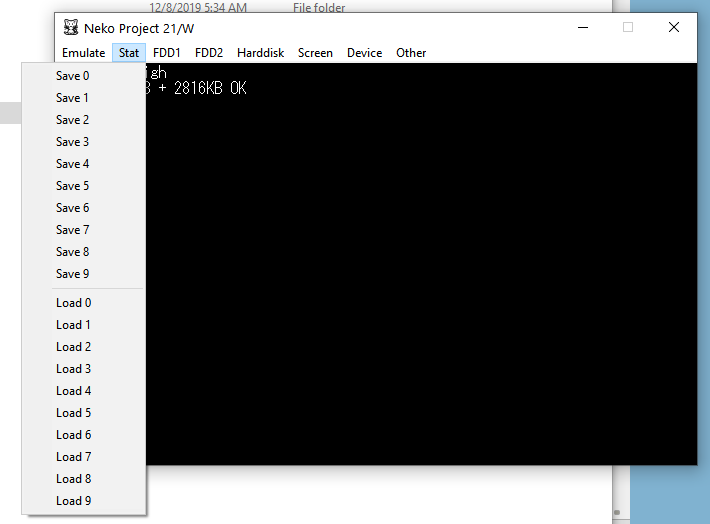
Enabling Savestates
A common feature with emulators is the ability to savestate. While on
first glance this option is seemingly absent from Neko Project 21/W,
it's actually just hidden away.
Open 'np21w.ini' found in this same directory as your
emulator exe file. If you don't see it, you may need to boot and
close you're emulator at least once to generate it.
Add the 'STATSAVE=true' in a new line under the
'[NekoProject21]' section and save.
Next time you open your emulator you should notice a 'Stat' tab that
allows you to save up to 10 states.
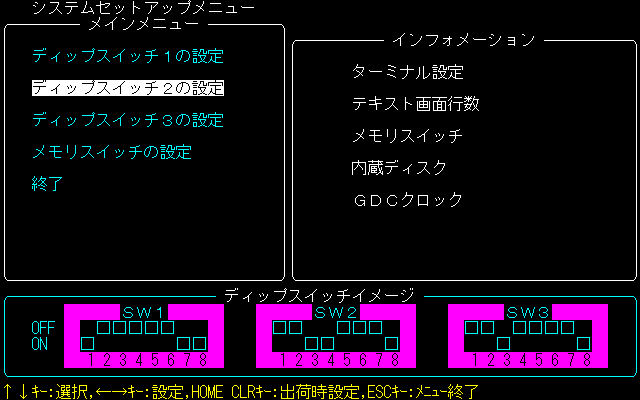
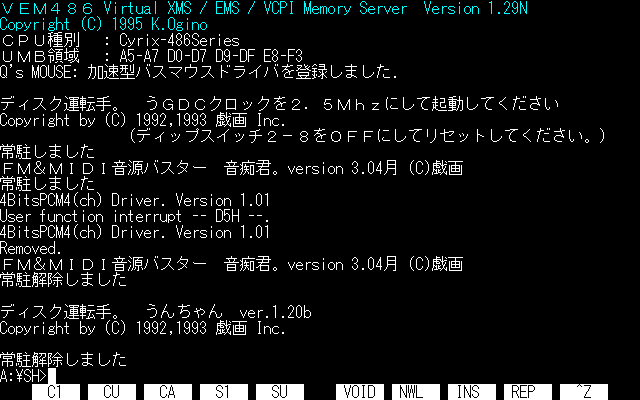
Adjust GDC Clock
Some games require your GDC Clock to be set to 2.5MHz instead of the
default 5MHz. If a game requires this setting it'll sometimes glitch
by duplicating the screen into segments or even refuse to boot.
Luckily it’s an easy fix.
Hold the 'End' key on your keyboard and reset your emulator
while keeping the key held. Your emulator will now boot to machine
options.
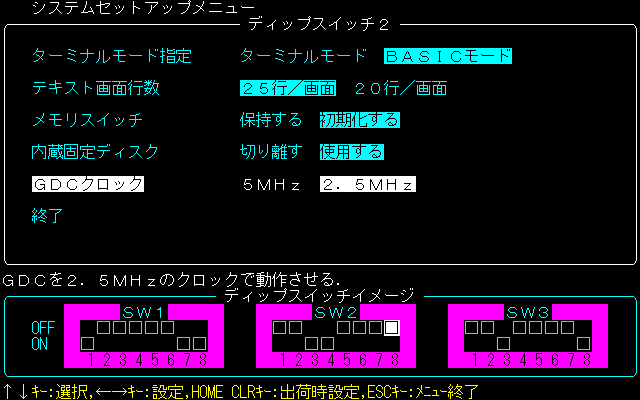
Select 'ディップスイッチ2' using the arrow keys (as seen in
the screenshot above) and hit enter.
Highlight your GDC setting and use the right arrow key to
switch it from its default 5MHz to 2.5MHz.
Exit machine options and restart your emulator by hitting the
bottom two options on both of the machine option screens.
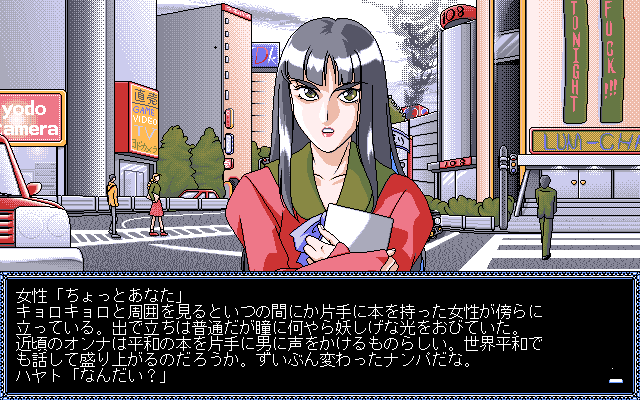
Tonight
Everything should work now as intended.If you think you messed up the
settings in your machine options a simple fix is to
go back to machine options and hit the 'home' key on your
keyboard. This will restore everything to their default values.
How To Play Games
How To Load Software
Floppy Disk Images (common extensions are
HDM, FDD and FDI) can be loaded into either FDD1 or
FDD2, but unless you already have something inside FDD1 and
need to use multiple disks you shouldn't need to use FDD2.
Harddisks (common extensions are HDI and NHD) and
CD images are loaded into the Harddisk. You have 4 slots
for different images, but typically you'll just be using one at a
time. Harddisk drives need to be configured to use either harddisks or
CD’s. By default Neko Project 21/W has IDE #0, #1 and #3 set for
Harddisk Images and IDE #2 for CD’s. Changing these settings can be
done in IDE Options.
The Neo Kobe Collection contains both Floppy Disk Images and Harddisk
images for most of the games it contains. When given the option,
I recommend always using Harddisk Images. Some floppies require
installation, and the ones that don’t often require disk swaps
mid-game. All this work is done for you if you’re using HDIs.
Now that you know the difference between software formats and drive
types, loading software should be pretty easy:
Select the correct tab depending on the format of your software.
(Floppy Discs go in FDD, Harddisks and CDs go in Harddisk)
Select the game in your file explorer.
Reset your emulator by going into Emulate => Reset. Your game
should typically autoboot.
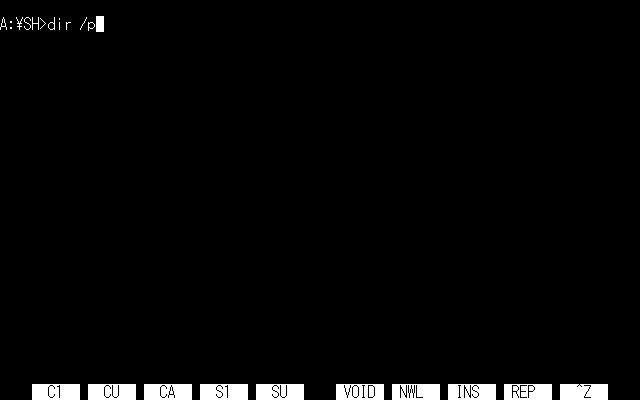
How To Start Game If It Doesn’t Autoboot
It’s rare, but occasionally after loading your software it doesn’t
autoboot and presents you with a blank DOS screen. This just means we
have to boot the software ourselves.
Type "DIR /p" and hit enter. A list of the files on your disc
should begin to be listed.
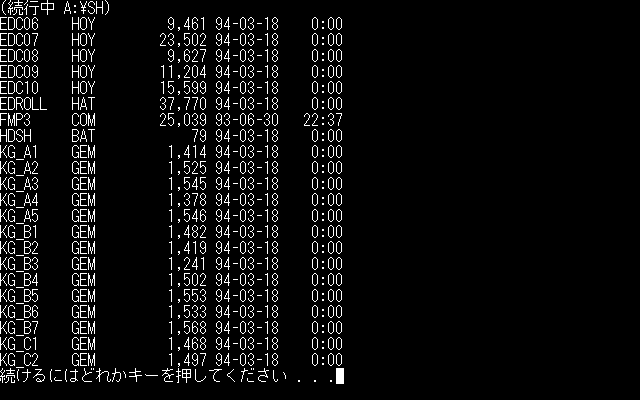
If your list of files just includes folders, type
“cd FOLDERNAME” to navigate to a different folder, then type
“DIR /p” again to see what’s in that directory.
Look through the pages until you find a file that looks like the
executable for your software. It's typically
an abbreviation of the name of the game with a .BAT extension.
Type the filename into DOS and hit enter. You might have to do this
with a few different files until you hit the right one. Once you
find the right file your game should boot up.
How To Control The Internal Mouse
F12 or Middle Click.
How to play CD Based Games
Under the Harddisk tab click IDE Option. Set the
Master Primary to HDD and
Master Secondary drive to CD-ROM. This is the default, but if
you've been playing other games it might've wound up as something
else by now.
Extract both the HDI and CD images from the game's folder in the
Neo Kobe Collection. Both images are needed to boot your game. If you don't have an
HDI for your CD game go to the next section to
see what to do next.
Hit the Harddisk tab again, open your HDI in IDE #0 and your
CD image in IDE #2.
Check the title of your emulator and make sure your CD image
is listed after CD1. If it's not you might need to reselect the game
until it holds.
Reset your emulator and your game should boot.
Using YAHDI to boot CD Software
If you don't have an HDI that's been bundled with your CD image don't
worry, we'll just have to use another HDI that has your CD-drive
correctly setup. A popular image used for this solution is
YAHDI. There's a lot of cool tools within this
HDI, so read over the forum
post if you're interested. While normally it takes a lot of
preparation to get everything working right I've preconfigured and
compiled a harddisk image for Neko Project 21/W which you can
download here.
Set YAHDI.nhd as IDE #0 and your CD image as IDE #2.
Check the title of your emulator and make sure your CD image
is listed after CD1. If it's not you might need to reselect the game
until it holds.
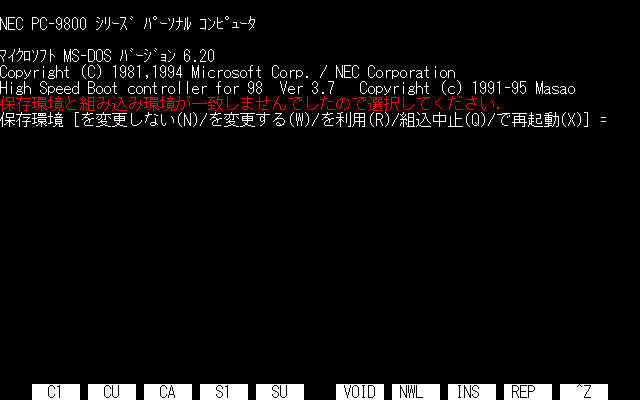
Reset your emulator
If you get the screen above hit the W key and let the disk
image adjust to your emulator configuration. You might have to just
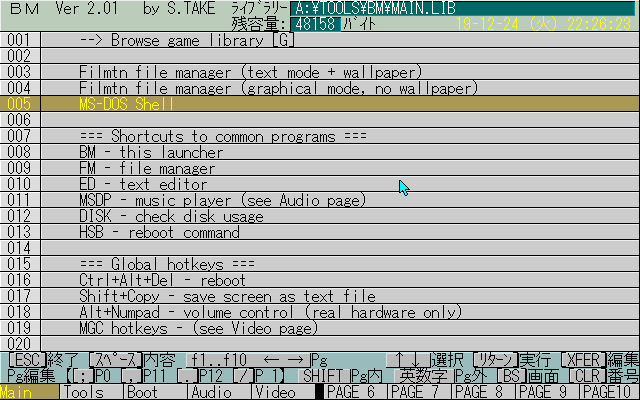
do this every so often.
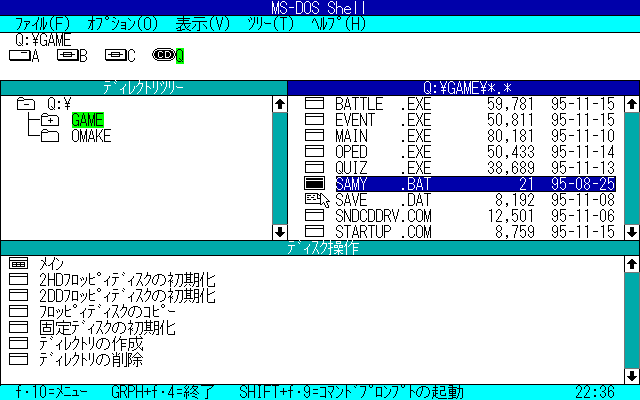
Select ‘MS-DOS Shell’ on the YAHDI home screen
You should see an A, B, C and Q drive. Your Q-Drive is your CD
Drive. Select the Q-Drive and hit tab.
Select either the boot file or install file for your game.
Some games require an install, but others you can run right off the
CD. For this game I found the .BAT file that launches the game under
the GAME folder.Try opening different BAT files until one works. If
none work, there should be an INSTALL file somewhere else on the
disc. I’ve included another section in this tutorial about
installing games. Feel free to install your game right onto the
YAHDI disk image.
Game Recommendations
It can be overwhelming when deciding what games to start out with.
Here’s 40 games I enjoyed that I think you might enjoy too. They're
sorted by publisher since that's how they're sorted in the Neo Kobe
Collection.
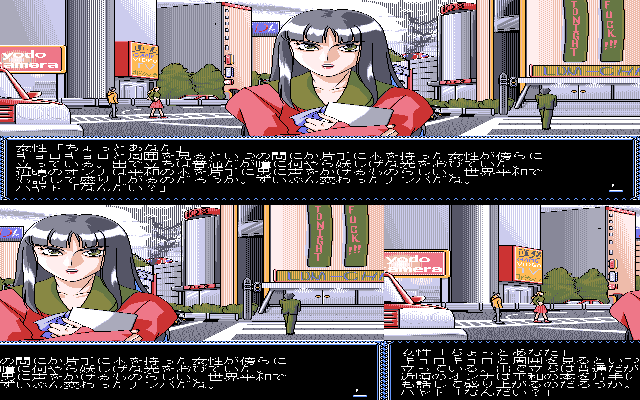
Clicking on the title of a game will take you to a search result of
all the screenshots PC-98 Bot has posted from that game, so you can
see if it suits your vibe. If a game really clicks with you I
recommend checking out that game's publisher's other games too. If
nothing on this list looks cool to you, it might turn out I have
really bad taste in PC-98 games. If that’s the case you shouldn’t get
mad at me, you should feel sad for me.
Asenheim has translated and
ported over a bunch of PC-98 visual you can play rigt in your browser.
If all this emulation stuff overwhelms you and you just wanted to jump
into some English PC-98 VN's right away this is a great option. Heads
up though -- most of these VN's are NSFW.
Textractor is a tool that can be used to extract text from games and translate them on the fly. It can be a
little finnicky to set up, but once you get it working it's probably the best way to play untranslated PC-98
games. You can read
about setting
up Textractor here.
Manage Game Assets
How To View CG
PC-98 games are well known for their gorgeous pixel art, so it makes
sense that you might want to skip the gameplay and just look at the
art. Unfortunately this is harder than it sounds. PC-98 games use
proprietary image extensions exclusive to certain developers, and
sometimes even exclusive to specific games. Because of how niche these
file types are, modern support for working with them is relatively
non-existent. You do have a few options though, and hopefully one of
them works!
MLD
MLD is a useful program used for managing image files within DOS. Once
you find out what image extension you’re working with,
check
this translated version of the MLD manual to
see if MLD is compatible with your file.
Just ctrl+f and search the document for the extension you’re looking
for.
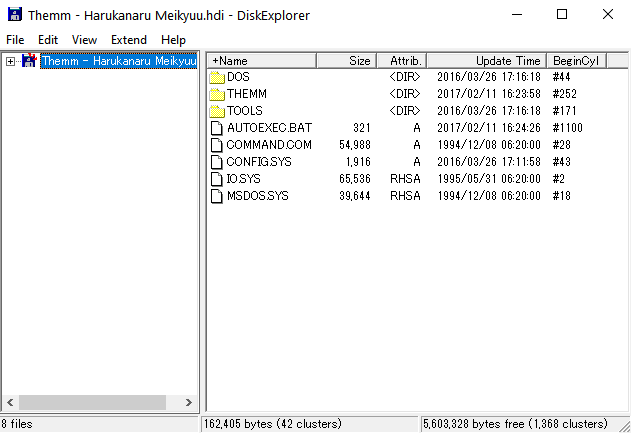
Download DiskExplorer.
This is used to import files from our computer into hard drive
images used within our PC-98 emulator
Open your DiscExplorer zip, then open editdisc.exe.
Select the HDI that has your game installed on it. editdisc
will ask what type of image your HDI is, but the default is almost
always correct.
Import MLD.exe into the DOS folder of your HDI by dragging
and dropping it. If you get an error saying there’s not enough space
on your HDI you can download the
YAHDI dump from this guide. I've included
MLD.exe in the DOS folder of that. Just remember if you’re using
YAHDI the location of your game will be on a different drive, so
you’ll have to specify which drive when you type the image locations
later on.
Find your game’s image file location. Since your game is
already open in editdisc, just click around until you find files
that your intuition you tells are images. This can sometimes be a
guessing game. I often look for files with names that mention CG,
CHAR, or BG.
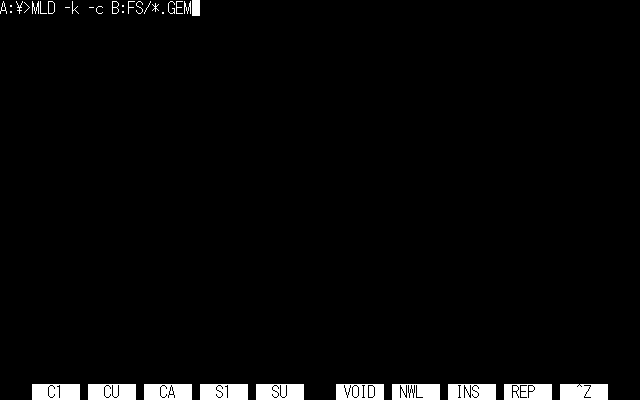
Open your HDI in your emulator and go to your command menu.
If your game autoboots, you just need to exit the game. If you’re
using YAHDI just hit the esc key on the home menu.
Type the following prompt: MLD -k -c <IMAGE
LOCATION>*.<IMG EXTENSION>. Obviously replace <IMAGE LOCATION> and <IMG EXTENSION>
with the information you found in step 5. If I was hoping to
open the images in 'Farland Story - Tooi Kuni no Monogatari' I would
type “MLD -k -c FS/*.GEM”, since the game’s images are in the FS
folder and have the extension GEM. To explain this string: MLD
launches the program, -k enables the option to tab through the
images with space, and -c clears the screen after each image. For
more information on MLD options
read the MLD manual.
If MLD supports your file type your images should begin to open one
at a time. Hit space to tab through them.
Susie
Susie is an old Japanese image viewer for Windows useful for its
plugin support. A lot of the times you’re able to find plugins for
even the weird file types used in PC-98 games.
Download DiskExplorer.
This is used to export the game files from the HDI so we can
begin to interact with them outside of our emulator.
Open your HDI with editdisc.exe and save the game's files them to
your computer. Just clicking and dragging the folder is enough.
Identify your image filetype. Just click around your game’s
folder until you find files that your intuition tells you are
images. This can sometimes be a guessing game. I often look for
files with names that mention CG, CHAR, or BG.
Find an SPI for your filetype. SPI’s (Susie Plug-Ins) can be
difficult to find, and you need a different plugin for each file
type.
This zip folder includes dozens of SPI's specific to various game
publishers. If your filetype isn’t covered in the zip folder it’s worth
checking
Vector, a site with tons
of old Japanese software. Just search the
filetype extension you're looking for accompanied with the keyword
"SPI". Something might turn up.
If you’ve found an SPI for your filetype
install it by dragging and dropping it into the same folder as
your Susie executable.
Open Susie, click the top button. Navigate to where your
images are stored on your computer. If your SPI is working, your
images will show up in your file browser. Open your image and
hopefully it works!
If neither of these options work, that’s normal. I recommend trying
the spriters resource forums or the PC-98 Discord channel to see if
anyone else has been able to find a solution for your filetype,
however know there’s a large chance it hasn’t quite been cracked yet.
Resources List
This guide is by no means meant to be comprehensive. If you have
questions not covered in the guide I recommend checking out these
resources:


 Luckily it’s an easy fix.